Sunday, September 20, 2015

Couch DB

What is CouchDB ?
  • It's an open source NO-SQL database as we don't use the legacy SQL Statements to query the DB.
  • It's a document storage Database as it holds the collection of independent documents [Document holds the data as the JSON Objects.].
  • Uses HTTP based API  for CRUD Operations.
Why CouchDB?
  • Have HTTP Based API to retrive the Data.
  • Follows Atomicity while saving the Data into Documents. Either all Data is saved or not saved at all.
  • Have Views that would allow to join many Documents to have multiple view of Data.
Setting up CouchDB
  • We can either have our own DB at Cloud using http://www.iriscouch.com/
  • Else Avail the local CouchDB from http://couchdb.apache.org/. Once Setup, access the Futon(admin console) at http://127.0.0.1:5984/_utils/ if it's been locally setup.
  • CouchDB allows you to write a client side application that talks directly to the Couch without the need for a server side middle layer, significantly reducing development time.
cURL
  • cURL is a tool available in Linux, Mac, Windows etc Platforms and can be used to transfer the data to a CouchDB via HTTP, Telnet, HTTPS, FTP and LDAP Protocols.  
  • Below command returns the UI part of accessed URL.

curl https://www.facebook.com

Flags in Curl

-X Flag = tells curl to use the provided request method and not the default i.e. GET
-d Flag = helps in passing the data along with  Request methods.

curl -X PUT http://heckteck.com -d userid=ttt -d password=ttt

-o Flag writes the requested url into a file

curl -o index.html https://www.facebook.com

Interactions with CouchDB via cURL
  • Check Connections with CouchDB [ curl http://127.0.0.1:5984/ ]
  • List all DBs of CouchDB [curl -X GET http://127.0.0.1:5984/_all_dbs ]
  • Create a new DB in CouchDB [curl -X PUT http://127.0.0.1:5984/myDB ]
  • Verify if the new DB been created [curl -X GET http://127.0.0.1:5984/_all_dbs]
  • Get the Information about the newly Created DB [curl -X GET http://127.0.0.1:5984/myDB ]
  • Create a new Document in CouchDB with Document ID[ curl -X PUT http://127.0.0.1:5984/test_suite_db/"testerid" -d '{"lockerno": "123411","facility":"inot"}' ]
  • Return values of a Document with Document ID. [ curl -X GET http://127.0.0.1:5984/test_suite_db/"testerid" ]
  • Delete a Document with Document Id and Revision Id [ curl -X DELETE http://127.0.0.1:5984/test_suite_db/testerid?rev=4-a58140641ffbeffa9c5d552265067016 ]

Maps & Reduce

Open CouchDB -> Select any DB -> Navigate to Views Drop Down on right and Select Temporary Views.

Sample Maps

function (doc) {
    if (doc.name === "Ananda") {
        emit(doc.name,doc.value);
    }
}

Sample Reduce

function (keys,value) {
    return sum(value);
}

[ Note: This would iterate through all the Documents in that DB and return the filtered result. The filtered result then get reduced by reduce function. ]

Map and Reduce Functions offer great variations to the Document to the document Structure and the resultant is called View in CouchDB Terminology.

Default Sort Order is based on the IDs to makes the Views efficient.

Value from the Map Function gets passed onto the second attribute [normally marked as value as above] of Reduce Function.

Group Level Re-reduce:

In certain map function, you may have group of keys as Array as below:

function(doc) {
var store, price, value;
if (doc.item && doc.price)
{
for (store in doc.price) {
                   emit([doc._id,store],{store:store,price:doc.price[store]});
        }
}
}

Array of Keys in Map Emit Function can be helpful in performing group level re-reduce emit([doc.name,doc._id],doc.value);

Let's then have the sample reduce function as below:

function(keys, values) {
    return values.length;
}

Now if we enable reduce check button, we can find the value filtered producing the key as [doc._id,store]. The default group level reduce is exact. In case of group level 1 reduce, we have only one key [doc._id] available. When on group level 2 reduce, we have all two keys available.


B Tree Index:

CouchDB employs B Tree indexing to store and retrive the Values internally. You can have a look at Wiki Page for more info on B Tree [https://en.wikipedia.org/wiki/B%2B_tree]




Saturday, August 1, 2015

Message Oriented Middleware and Messaging Protocols

What is Message Oriented Middleware?

                        Message-oriented middleware (MOM) is software or hardware infrastructure supporting sending and receiving messages between distributed systems.

MOM and its Providers

IBM MQ      -> IBM
ActiveMQ    -> Apache
SonicMQ     -> Progress
RabbitMQ    -> Rabbit Technologies

Messaging Protocols

Even after selecting the messaging middleware application, selection of messaging protocol and understanding them becomes a huge hurdle.

>>AMQP (Advanced Message Queuing Protocol)

              Advantages: 

                    1.  Interoperable. [To understand this let's go thorugh why AMQP came into existence as below with http://www.wmrichards.com/amqp.pdf as reference material]
                             Java Messaging Service offers the Standard such the Producer and Consumer if  implemented in Java, the message broker [ActiveMQ/ RabbitMQ/ any other Message Oriented Middleware] used can be replaced with few lines of Code Change. 
                           However if Producer is written in java and Consumer written in Ruby, then JMS standard becomes no use, change of Message Broker would result in Code refactoring at both the ends.
                           Thus AMQP was brought it to support message interoperability. If AMQP supported message Broker is used as Message Oriented Middleware then the entire problem would be solved as AMQP provides the Standard for how the message to be Structured and transmitted.

                    2.  Reliable - Provides Subscribe Feature, Provides options for Controlling  Message Queue Size.

>>MQTT (Message Queue Telemetry Transport)

            Advantages:

                 1. Have very less API Methods and it's Simple.
                 2. Efficient for power Constrained Devices - Ex: Smartphones.
                 3. Data Exchanged in Binary Format.
           
             Disadvantage:
                
                1. No Message Queue in spite as in the name.

>> STOMP (Simple Text Oriented Messaging Protocol)

           Advantages:

                1. Data Exchange Format is Text Based. 
                2. Similar to AMQP and MQTT provide frame header with Properties and body.

          Disadvantages: 
                

                1. No Support for Message Queue.

Friday, July 17, 2015

Docker


What is Docker?

                  Docker is a platform for developing, building and shipping the application using Container Virtualization Technology.

What Docker Consists of?

                 Docker Platform itself composed of many tools:

                        >>Docker Engine
                        >>Docker Machine
                        >>Docker Hub
                        >>Docker Swarm
                        >>Docker Compose
                        >>Kitematic

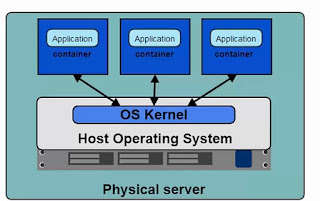
[Note: Container Virtualization uses kernel on host to create multiple containers. From outside it looks like we are dealing with VMs and not containers. But it is not.

We may be using the term hypervisor at many places below and a short note on what hypervisor is. A hypervisor or virtual machine monitor (VMM) is a piece of computer software [Ex. VMware VSphere], firmware or hardware that creates and runs virtual machines.
A computer on which a hypervisor is running one or more virtual machines is defined as a host machine. Each virtual machine is called a guest machine. ]
Why Docker?
               >>Docker interacts directy with the Kernel of Host OS whereas the hypervisor are something installed on the Host and operates based on the Guest Instances sharing the Hardware Resources.
Docker Architechture
Hypervisor Architechture
This inturn sparks a question in mind. What makes Containers different from VMS?

  • Containers interact directly with Host Kernel.
  • Containers are lightweight and can be started quick.
  • Containers requires less CPU and RAM to Start up. Thus we can have more Containers. 
Docker Machine:

  • It's nothing but the boot2Docker that helps us setup the Virtual Linux Box, place Docker Engine within and Configure Container to talk to this Engine.
  • Docker Machine act the Docker Host.

Docker Engine:

Also referred as Docker Daemon.
  • It's a program that enables the Containers to be built, shipped and run.
  • The Docker Engine uses Linux-specific kernel features. We can relate just like the one below if our OS is Windows / Mac. 


Docker Engine

  • Thus we install boot2Docker that sets up the Virtual Linux Box and have the Docker Engine placed with in.

Docker Client
  • Docker clients helps in interacting with the Docker Server/ Docker Engine/
  • Docker Client fetch the Input from User and pass the details back to Docker Daemon for processing.
  • Docker Client and the Docker Machine(boot2Docker) in most of the cases are installed in the same host. Here it is the OS Platform that we use.
  • If not happy with Command line docker, we also opt for Kitematic that GUI Tool for interacting with Docker daemon.
[Note: command docker version on container returns the Daemon Version and the Docker Version]
Containers Vs Images:
         Images are read only Templates used to create the Containers. Stored in Local or the Docker Hub. While Containers are the Application Platform made up of multiple images.

Docker Registry/Hub Vs Repository:
         Images  can be stored in the registry/ Docker Hub. The registry holds multiple repositories and repository holds multiple images.

         Example: Docker Hub Public Registry - https://registry.hub.docker.com
                         Image fetched from repository is run using docker run [repo_name: tag_name] command

How to create the Docker Engine?

Gets Automatically created if not created at the start of the boot2Docker terminal. This is just a general info.

      Step 1:  Run the common in terminal boot2Docker delete
     Step 2:  boot2Docker init - brings up the Docker Engine. 
     Step 3: boot2Docker up - starts the Docker Engine and would make it run.
      Step 4:  boot2Docker ip - brings the IP Address
    
Common Docker Commands:

           docker run [repo_name: tag_name of image] -> Fetch the Image and installs in the Container.       
           docker start name_of_container -> Starts the Container.
           docker stop name_of_container -> Stops the Container.
           docker ps [-a include stopped containers] -> Lists all the Containers.
           docker rm <image | id>  -> Remove a Container.
           docker login Login the Containers with Docker Hub Credentials.


Sunday, July 12, 2015

Squirrel SQL

Squirrel SQL:

The SQuirreL SQL Client is a graphical program written in the Java programming language that will allow you to view the structure of a JDBC-compliant database, browse the data in tables, issue SQL commands and much more.

Configuration of Squirrel SQL to connect to Derby Database:

Step 1: Launch the Squirrel SQL.


Step 2: Click Add button and would be presented with the below dialog. Provide the Name, Example URL, Website URL and in the external Class Path, add the Jars derby.jar and derbyclient.jar that comes along with the Installation of Derby Database. Click OK button


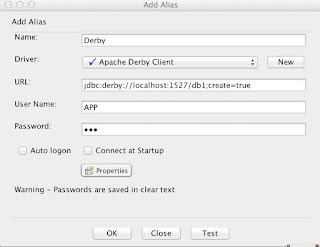
Step 3: Select Alias Tab. Feed in the below details: Sample Name, Driver that we created in Step 2, URL, Username and password being APP, Select Auto Logon and click Ok Button.


Step 4: Now we would be able to view the Contents of Derby Database.

Apache Derby

Apache Derby:

What is Apache Derby?
  • Relational database management being developed by Apache Software Foundation. 
History:
  • Was initially developed by the Developers of Cloudscape.
  • Informix later acquired Cloudscape. Acquisition continued. IBM acquired Informix and still extended its support for Derby.
  • Time Progressed. IBM later withdrew its support and Apache Software Foundation continued the development of Apache Derby.

Features of Apache Derby:


Max DB Size                      Unlimited

Max Table Size                  Unlimited
Max Row Size                    Unlimited
Max Columns per row      1012
Max Column Name Size   128 bits

When Apache Derby?

  • Apache Derby being written in Java and thus usable only by Java and other scripting languages(Jython, JRuby, Jacl, etc)  that run on JVM.
  • Consumes less Footprint and can be opted when we look for DB that can set quickly.
Installation of Apache Derby:
      In Windows:
                 >> Set the environment variable DERBY_HOME to the Derby installation directory
                 >> Add DERBY_HOME/bin to the "path" environment variable

       In Mac:
               >>Open the Terminal and hit vi ~/.bash_profile 
               >>Now enter the below set of values
                     export DERBY_HOME=/Volumes/D Drive/Softwares/db-derby-10.11.1.1-bin
                     export PATH=$PATH:$DERBY_HOME/bin

Check the Installation    

To check if Derby has been successfully installed, run the following command where /User/hspadmin... is the location of derbyrun.jar residing within lib directory

java -jar /Users/hspadmin/Applications/db-derby-10.11.1.1-bin/lib/derbyrun.jar sysinfo


Once run, you should get the below output:

------------------ Java Information ------------------
Java Version:    1.7.0_75
Java Vendor:     Oracle Corporation
Java home:       /Library/Java/JavaVirtualMachines/jdk1.7.0_75.jdk/Contents/Home/jre
Java classpath:  /Users/hspadmin/Applications/db-derby-10.11.1.1-bin/lib/derbyrun.jar
OS name:         Mac OS X
OS architecture: x86_64
OS version:      10.9.5
Java user name:  hspadmin
Java user home:  /Users/hspadmin
Java user dir:   /Users/hspadmin
java.specification.name: Java Platform API Specification
java.specification.version: 1.7
java.runtime.version: 1.7.0_75-b13
--------- Derby Information --------
[/Users/hspadmin/Applications/db-derby-10.11.1.1-bin/lib/derby.jar] 10.11.1.1 - (1616546)
[/Users/hspadmin/Applications/db-derby-10.11.1.1-bin/lib/derbytools.jar] 10.11.1.1 - (1616546)
[/Users/hspadmin/Applications/db-derby-10.11.1.1-bin/lib/derbynet.jar] 10.11.1.1 - (1616546)
[/Users/hspadmin/Applications/db-derby-10.11.1.1-bin/lib/derbyclient.jar] 10.11.1.1 - (1616546)
[/Users/hspadmin/Applications/db-derby-10.11.1.1-bin/lib/derbyoptionaltools.jar] 10.11.1.1 - (1616546)
------------------------------------------------------

Command to Start the Derby Server

            startNetworkServer

Change the Port of Derby Server

     By default Derby Server runs on the port 1527 and we can change the default port by the below command:

           startNetworkServer -p 3301

Accept of Connections from specific host:

   By default Derby accepts connections only from localhost and to make it accept the request from other hosts, run the below command with ip address/ domain name

         startNetworkServer -h  testserver.testdomain.com

Accept of Connections from all Host:

         startNetworkServer -h  0.0.0.0

View the Contents of the Database:

Apache Derby doesnot provide any provision for Graphical view of the DB Contents. 
We normally use the Tools IJ / Squirrel SQL Client for this Purpose.


Wednesday, May 27, 2015

JSHint


What is JSHint?
  • Static Code Analysis Tool - means analysis is done without actually executing the Source Code.
  • Flexible and facilitates the customizability of Coding rules.
What JSHint does?
  • Validates the Javascript code to check if it complies with the predefined coding rules.
  • Ensures Code quality and improves maintainability.
Architecture of JSHint
  • JSHint rests on top of JSLint (Lint Project initially set up Crockford)


Setting up JSHint
  • JSHint is distributed as a node module and thus it requires Node.js and NPM to be installed in the System.
  • Install jshint globally with the below command which would help us to trigger JSHint directly via cmd.
           > npm install -g jshint 


  •  Now that we have installed jshint , we can run the analysis against any Javascript file like one such below.
           >jshint testFile.js


.jshintrc - Configuration file

  • .jshintrc is the configuration file where we define the rules that our Source Code should comply with.
      Generation of of .jshintrc
              
               * We use yeoman to generate this file as JSHint command line tool doesn't facilitate this generation.
              Yeoman is a Scaffolding Tool. It's ok if we are not familiar with yeoman at this moment, we gonna just execute the couple of commands below with it for .jshintrc file generation.

                npm install -g yo  [Installs yeoman]

                npm install -g generator-jshint  [Installs jshintrc generator - one of Yeoman Generator]


                yo jshint [Generates .jshintrc file]


[Refer https://github.com/jshint/jshint/blob/master/examples/.jshintrc for the default values for the Applicable rules]

Static Code Analysis .jshintrc File

  • Execute the command jshint .jshintrc js/app.js to run the analysis for the app.js file within the directory named js. 


  • In the command jshint and .jshintrc corresponds to the jshint installed globally  and  .jshintrc - configuration file generated earlier using yeoman.


Friday, March 6, 2015

Ruby Gems - Compass and Sass

Ruby Gems
  • RubyGems is a package manager for the Ruby programming language.
  • Facilitates the easy installation of gems [Ruby Programs] and also in managing the Server that distributes gems

Why we go for Ruby Gems?
  • Ruby Gems helps in downloading and managing the gems. In specific it helps in installing the Sass tool and compass too to compile the .scss files to .css

Installation of Ruby Gems
  • RubyGems comes as a part of standard library with the Ruby Version 1.9.
  • Download Ruby Gems from http://rubyinstaller.org/downloads/ and install it.

Installation of Gems:
Let's install sample Gem [Sass / Compass - Ruby Gems]
Step 1
    Check if Ruby and Ruby Gems have correctly installed using the commands
ruby --version
gem --version
Step 2
    Setup up the Environment in the Platforms Windows and Mac.
    Windows
    Run the below commands that removes the SSL security which in turn would help us handshake with Ruby Server      
        gem sources -r https://rubygems.org/ - to temporarily remove secure connection
gem sources -a http://rubygems.org/ - add insecure connection
gem update --system - now we're able to update rubygems without SSL
    Mac
    sudo gem update --system  
        xcode-select --install //Installs the xcode command line tool that lays the platform for installing compass later
Step 3
   Install the gems as below
    Windows:    
    gem install sass
  gem install compass
    Mac:
    sudo gem install sass
    sudo gem install compass