Friday, February 27, 2015

Grunt

What is Grunt?

Grunt is basically a TaskRunner that automates the repetitive tasks such as minification, compilation of preprocessor language into css and also act as an effective build system.

How Grunt Works? [Just know how things work in general, we would see it in detail in sections following below]

We run the grunt command at the Projects Root Directory, Grunt-CLI looks for Locally Installed Grunt [We install grunt locally by running the command npm install grunt --save-dev at Project Root Directory]and if found loads it. Once done Gruntjs file (holds required configurations for Grunt tasks to run) is loaded and configurations in it is applied and Gruntjs File also in turn loads the package.json file if needed which is provided by npm [generated by npm init command].

Installation of Grunt Command Line Intrerface and Setting up Grunt

Step 1: Install the Grunt Command Line Interface globally using the command npm install grunt-cli -g  


[ Note: Grunt-cli doesn't include the Grunt Task Runner.  Grunt -cli  is mainly used to process the Grunt Files located somewhere in the system. To perform automation and the Minification Task, we actually need grunt installed within the working directory.]

Step 2: Check if grunt is installed succesfully using the command grunt --version 

Thus the Grunt Command Line Interface has been successfully installed globally and would be able to access it via command line

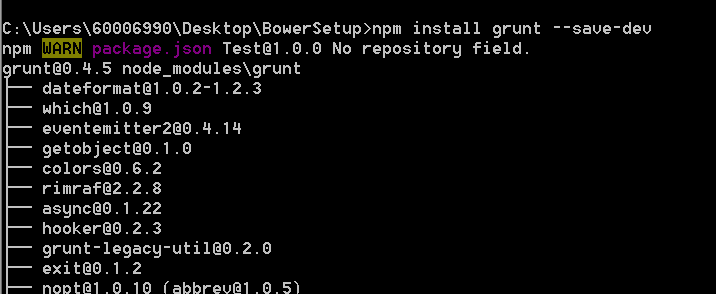
Step 3: Now let's setup the Grunt Task Runner Locally. Navigate to the Project Root Directory and run the command npm install grunt --save-dev. This would generate node-modules directory and place grunt task runner within.


Step 4: Generate the package,json file by executing the command npm init at Project's Root Directory.

We now have Grunt-Cli Installed Globally, Grunt Task Runner Locally and package.json file created.

Setting up Gruntfile.js 

To Specify what Tasks need to be run, Register the Tasks, Load the required NPM Modules for executing the Tasks etc we need some configuration mechanism and GruntFile.js serve this purpose.

Sample Working Grunt Demo 

Tutorial 1: Using Grunt, we are going to compile .less file to .css file and the .coffee file to .js file

Step 1 : Let's create a Directory that all our work would go within. Install Grunt locally by executing the command npm install grunt --save-dev 

Also install Grunt Coffee Plugins and Less Plugin as below:

Step 2: Create an html file named index.html, and files site.less and site.coffee within directories  less and coffee respectively such that complete working directory would be looking as below.


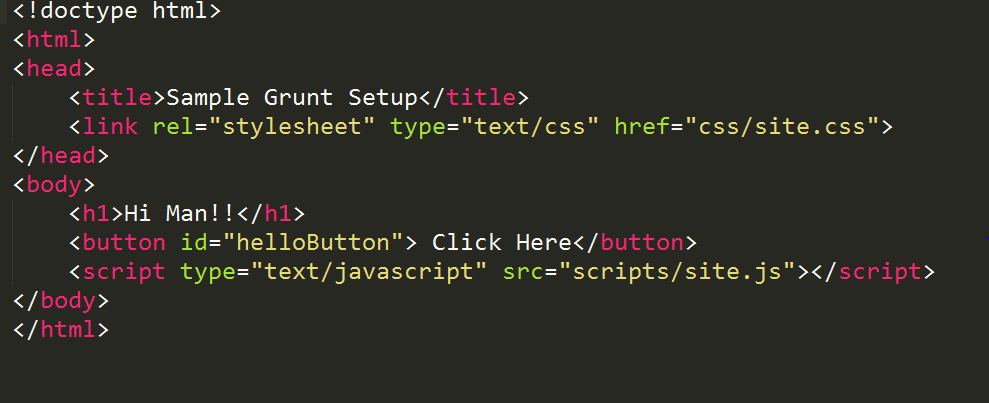
Step 3: Include these entities in the Html File, .coffee file and .less file


index.html


site.less

site.coffee
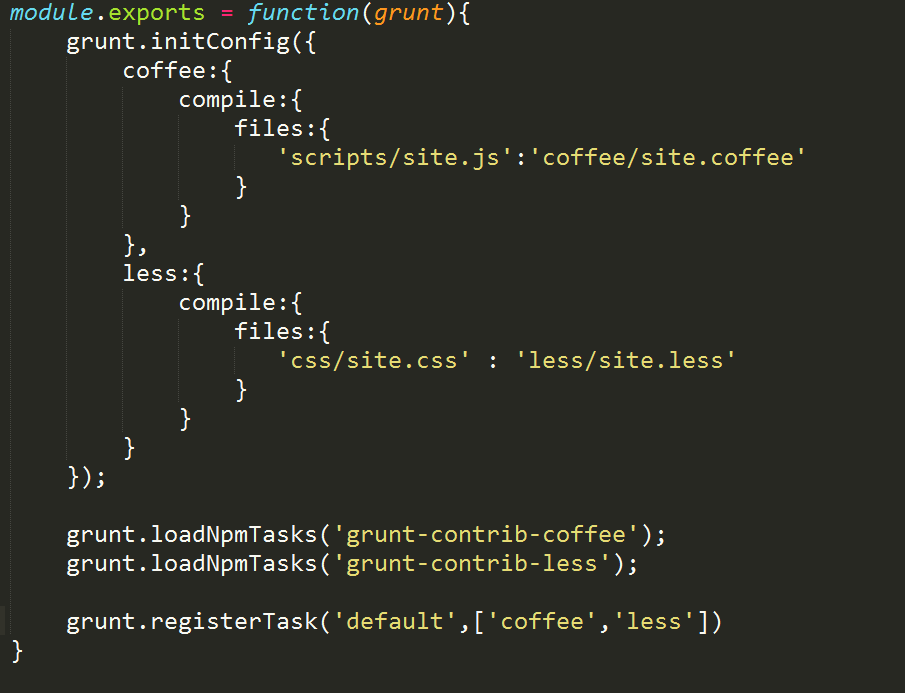
Step 4: Now create the GruntFile.js that takes up the required configurations to initialize the task, load the required NPM Modules, register the Task etc.


Step 5: Execute the Command grunt at the project root directory to invoke the Grunt-Cli which inturn would generate the .css and .js file from .less and .coffee  files respectiely.

Step 6: Run the index.html to find how the generated .css and .js applies.


Thursday, February 26, 2015

Bower

What is Bower?

  • Bower is a package manager like NPM and it  primarily deals with Front End Dependencies.
  • It works with GitHub to install the Dependencies in the Local Directory and is written in JavaScript.
Installation of Bower:
  • Bower is installed with npm using the command npm install -g global.

[Note: -g flag places Bower globally]
  • To validate if Bower has been installed correctly run the command bower --version

Installation of Dependencies:
  • Let's try to install a bower component [which is none other than Front End Dependency like Angular, JQuery, JQueryUI etc]
  • Navigate to the project root directory and run the command bower install angular and this command would place the angular related entities inside the directory named bower_components which is located right underneath Project Root where we run the command.
          [ Note: In case if we are unable to reach github.com, that's because firewall is preventing it and we get the error message as below


and we ought to use https:// for connecting to github.  hence run the command git config --global url."https://".insteadOf git:// as below


This would make Installed Git Client to fetch the contents]


Generation of bower.json

bower.json file helps in maintaining all the bower components and we can generate the file by running the command bower init at the root directory. This would generate the bower.json file


The use of generating bower.json is that we don't need to have to check in the bower_components directory and it's contents into version control system. Checking In just the bower.json would do. At the other side, when the Users check out the bower.json file, they run the command bower install command and that would place all the required contents into the bower_components directory. Try this command by deleting the bower_components directory and run this command .

Difference between NPM Vs Bower

When we closely observe, Bower and NPM may look to work the same but there are subtle differences.


  • The biggest difference is that npm does nested dependency tree (size heavy) while Bower requires a flat dependency tree(puts the burden of dependency resolution on the user).
  • A nested dependency tree means that your dependencies can have its own dependencies which can have their own, and so on. This is really great on the server where you don't have to care much about space and latency. It lets you not have to care about dependency conflicts as all your dependencies use e.g. their own version of Underscore. This obviously doesn't work that well on the front-end. Imagine a site having to download three copies of jQuery.
  • Nested Dependencies could offer stability with maintenance of different versions of dependencies possible in the sense as below

[node_modules]
 -> dependency A Version 1.4
 -> dependency B
    -> dependency A Version 1.2
 -> dependency C
    -> dependency B
       -> dependency A Version 1.3
    -> dependency D

  • The reason many projects use both is that they use Bower for front-end packages and npm for developer tools like Yeoman, Grunt, Gulp etc where nested dependencies is imparted to give stability.


Wednesday, February 25, 2015

NodeJs

NodeJs

What is NodeJs?

        It's a cross-platform RunTime Environment (Java Developers can visualize it like JRE with an exception that NodeJS is utilized to execute JavaScripts) that uses Chrome V8 JavaScript engine to execute the JavaScripts.

Why NodeJS?

       JavaScripts are normally interpreted by Browsers. When considering the Environment out of browsers, JavaScripts aren't that powerful.

       Javascripts din't have access to File System for years. Though HTML5 introduces File API, the concept still doesn't gain much support outside chrome.

       How great would it be if we execute our Javascripts in some platform other than browsers and also impart many features to JavaScript. NodeJs serves this purpose.

When we need to go for NodeJs?
      
     Normally we start using NodeJs at two instance

  • First is that when we need to work with utilities built on top of NodeJs like Grunt, Gulp, Yeoman. Installation of these Node Package requires NodeJs to be installed in the System. [NodeJs is required here just to install other Node Package and we don't need to be expertise in NodeJs. Just an Installation of NodeJs would do (Node Package Manager comes by default with NodeJs Installation)]
  • Second is when you deal with Web Application Frameworks like Express, Koa etc that's being built on NodeJs, you obviously would have to deal with NodeJs. [In this case as a NodeJs Engineer, you would be dealing on how to setup the Server, Rest API Calls etc]

How NodeJs Works?

Architechture
  • NodeJS is built using the Chrome V8 JavaScript Engine and other C/C++ Libraries to support HTTP, TCP, DNS, Asynchronous I/O.
  • Also composed of JavaScript Modules.

Working with NodeJs -

Sample Execution of Javascript in NodeJs

Let's have a look at the sample tutorial of running JavaScript in NodeJs

Step 1: Make sure NodeJs is installed. Then type in node to enter the console region.

            var a =1;
            console.log(a);
                      

Step 2:  Ctrl + C twice to exit the node console.


Step 3: We can also prepare a separate javascript file with the contents and execute it as follows with the contents of file being. (Note: Make sure you are in the directory where the javascript file is in. Here the javascript file is considered as Module by NodeJs)

            var a =1;
            console.log(a);


Sample Execution of calling Module from another Module:

Step 1: Create a file named sample.js with contents

var a=1;
console.log(a +'There');
module.exports.a =a;

Step2 :  Create a file named sample2.js with contents

var sample = require('./sample.js');
console.log(sample.a);

Step3: Execute the Module sample2.js. The result is that contents of sample.js gets executed at first and also export the contents of module 1(sample.js) to module 2(sample2.js). [ Note module.exports.a =a; at sample.js file would  save the value of a in exports module typed a. We inturn acquire this in sample2.js file using the variable named a which was earlied given to it]


Node Package Manager 

  • Node Package Manager comes by default with NodeJs and helps in downloading, installing and managing the Node Packages.
  • Based on the knowledge on modules, lets' try to install a module named underscore.
  • Let's setup the directory named Test and place the sample.js and sample2.js created as above within Test directory . Now navigate to directory Test and run the command npm install underscore

 [ Note: We can also do npm install underscore -g where this would install the module in global directory C:\Users\Istherino\AppData\Roaming\npm\node_modules\ at which the module could be shared by all the Projects ]
  • This would download the underscore module / node package  and place it within node_modules directory [node_modules directory is created in a place where the npm install underscroe command is executed]  
                         
  • Let's try to refer the downloaded module from sample2.js. Include the import module statement ( var underscores = require('underscore')) in sample2.js as below such that sample2.js file looks as below. This would look into the node_modules directory and search for a module named underscore. [Note: While referiing to underscore module within node_modules directory we didn't  use any relative paths like ./ ]
                  var underscores = require('underscore')

                  var sample = require('./sample.js');
                  console.log(sample.a);
                  console.log(underscores);


  •     Run node sample2.js and this would print the entire  underscore module as below.

Use of package.json
  •  If suppose we are working in a larger project and wanna check in the above files in Version Control System, we probably won't be checking in the node_module dependencies.

  • Instead ask the Users who check out the code to download the dependencies. This brings in another challenge that the downloadable module dependency list that is associated with the project ought to be maintained in a separate file. This is where package.json comes into the scene.

  • Move to the Project Root Directory. Here it is Test and run the command npm init. This generates a package.json file carrying all the dependencies listed in local node_modules directory.


  • Let's try to install another node_module and let it be backbone. Move to the Root Project structure Test and run the command npm install --save backbone


--save flag saves the downloaded dependency onto the package.json file. 

Now let's delete the node_modules directory in local project structure. Move to the root of Project Structure. Here it is test direcotory and run the command npm install. This would dowload all the dependency listed in package.json. That's the beauty of package.json file.

Also if we closely look at the package.json file, we have two types of dependencies

--save saves the dependency to dependencies{} [Dependencies that help in developement]
--save-dev saves the dependency to devDependencies{} [Dependencies that helps in deploying, building, testing  the application]

"dependencies": {
    "backbone": "^1.1.2",
    "underscore": "^1.8.2"
  },
  "devDependencies": {},


Setting up the Server in NodeJs using the inbuilt http module/package:

we can easily setup the Server using the below content placed in a .js file that would start up the server when run using node filename.js


var http = require('http');
var server = http.createServer(function(req,res){
console.log('got a request');
res.write('hi');
res.end();
});

server.listen(3000);


Tuesday, February 24, 2015

Setting up the JBoss Server

JBoss Server Setup:

          In this tutorial we would be moving through on how to setup the JBoss Server and how to configure the JBoss Eclipse Plugin in Eclipse.

Step 1:

     Download JBOSS Enterprise Application Platform Installer from http://www.jboss.org/products/eap/download/


The Installer download would be in the form of jar.

Step 2:
        
    Now let's install the downloaded jar component as below


Step 3: Proceed through the below SnapShots to complete the Installation


Note: Hit the URL http://localhost:9990/console/ and test if the installation is successfull.

Step 4: Now let's install the Eclipse JBoss Server Plugin by navigating to Help-> Install -> New Software -> Set Work with as http://download.jboss.org/jbosstools/updates/stable/kepler/ -> Under Java Web and Java EE Development , Pick JBOSSAs Tools


Once the installation of JBossAs Tools is done, you could find the options for starting, debugging the JBoss Server at the Eclipse Tool Bar as below. 


Note: From the version 8.0, JBossAs has been renamed as JBossWildFly8.0

Step 5: Setup a Web Project in Eclipse. Configure a RunTimeServer and run the project in Server. Done !!

[ Note: At times, when we attempt to run the Project in JBoss Server, we get the error as java.net.BindException


What happens here is that, JBoss is attempting to run the project at local server with port 8080. But already some application is utilizing the port 8080. Hence the JBoss can't get access to that. Hence we get the error message as address already in use.

We can overcome this by navigating to JBoss EAP Installation Directory -> Standalone -> Configuration -> standalone.xml -> Update <socket-binding name="http" port="8080"/> to <socket-binding name="http" port="8081"/>

Sunday, February 15, 2015

Hibernate Tutorial using Gradle Build System

Hibernate Tutorial using Gradle Build Tool

In this Tutorial, we'll be walking through on how to setup the Hibernate Project using Gradle Build System.

Step1: File -> New -> Other -> Gradle Project -> Give the name for the Project -> Finish.


Step2 : Our Project Structure would be now looking as below


Step 3: Now let's start with the creation of Config File (.cfg.xml) at src/main/resources directory along with the Hibernate Configuration Console (this helps in validating our connection against db)

      i) .cfg.xml Creation
   
      Select src/main/resources/org/gradle directory -> Right Click -> Hibernate Configuration File -> Give the name for .cf.xml -> Click Next and we will get the Window. Fill the Connection details as below. 
        

           We ought to make sure if Create Console Configuration option is checked at bottom as shown in picture above -> Click Next

         ii) Console Configuration Creation

           Once we click Next in above Window, we'll be taken towards another dialog to fill in the details for Console Configuration as shown below:

            In the Main Tab, provide the Hibernate Version value as 4.0 and proceed to Options Tab.   
          

         In the Options Tab, provide the Database Dialect value as Oracle 10g and move to Classpath Tab.


      In the Classpath Tab, click the button Add External jar and add the ojdbc jar as below and click Finish


Step 4: We gonna save objects into the Table named person having a column named id. So Let's create a POJO named Person with a variable named id.

Step 5: Now Let's create a Mapping Xml .hbm.xml. Select the directory src/main/resource/org/gradle -> Right Click -> New -> Other -> Hibernate XML Mapping File -> Next-> Add Class -> Add Up the POJO created in step 5.


Step 6: Now we ought to make an entry in .cfg.xml for the .hbm.xml. Select the .cfg.xml ->Select Session Factory Tab at bottom -> Select  Mapping -> Click Add Button -> Add the POJO.


How do we test if our mapping are right?

Select Hibernate Configurations Tab -> Select the Project -> Database -> Look for the Table which was mapped -> Right Click Table -> Select HQL Editor ->

Execute the Query as

           select id from person 

                    It would normally throw error as
                   Error
                   Fri Feb 13 15:59:12 IST 2015
                  org.hibernate.hql.internal.ast.QuerySyntaxException: person is not mapped [select                            count(p) from person p]

                 The reason is that w.r.t HQL, we should use the POJO names and not the actual table                          names.
                 Now reexecute the Query as and it would execute fine
          select id from Person 
        
Step 7: Create a Main Entry Class  i.e class with public static void main(){}

Step 8: Now time to make entries in Gradle to complete the Project Setup

   i) Include the reference for the Hibernate Dependencies.
     
  •  org.hibernate:hibernate-gradle-plugin:4.3.8.Final -> Includes three vital Components - group:name: version. Hence it should be included in the gradle build file as below:


   ii) Refer the entries for the ojdbc jars as below.
  • Make a directory named libs under main project directory and place the jdbc jar within. The structure should now be looking as below

  • Now refer the jdbc jar from build.gradle as compile files(libs/jdbc.jar) under dependency section as below         

  iii) Now load the dependencies specified in the gradle file by navigating through Select Project -> Right Click -> Gradle -> Refresh Dependencies.


  iv) Specify the Entry Point of the Application. This helps in executing the jars build by Gradle as the build System knows which is the Entry Point for the Application.


   v) Specify that while building up the Jar export all the dependency jar Files along with. This helps in running the application smooth.


Step 9: Now place the below source code at org/gradle/TestHibernate
public static void main(String[] args) {
// TODO Auto-generated method stub
  Configuration conf = new Configuration().configure("org/gradle/hibernate.cfg.xml");
ServiceRegistry serviceRegistry = new StandardServiceRegistryBuilder().applySettings(conf.getProperties()).build();
SessionFactory sf = conf.buildSessionFactory(serviceRegistry);
Session session = sf.openSession();
Person p = new Person(1111);
//p.setId(3421);
session.persist(p);
org.hibernate.Transaction transact = session.beginTransaction();
transact.commit();
session.close();
System.out.println("Done");
}

In the above snippet the relative path for .cfg.xml is given as
Configuration conf = new Configuration().configure("org/gradle/hibernate.cfg.xml");
How our Application detects this path?
Select Project -> Right Click -> Properties -> Build Path -> you can find the resources directory added to the Class Path 


Hence the path for directories within src/main/resources directory or java directory is specified as org/gradle/hibernate.cfg.xml

Step 10: Build the Project using Gradle and once done execute the jar file using the below command

E:\Workspace\KeplerWorkspace\SampleHibernate\build\libs>java -jar SampleHibernat
e-1.0.jar

Hurrah ! We did it !