What is Grunt?
Grunt is basically a TaskRunner that automates the repetitive tasks such as minification, compilation of preprocessor language into css and also act as an effective build system.
How Grunt Works? [Just know how things work in general, we would see it in detail in sections following below]
We run the grunt command at the Projects Root Directory, Grunt-CLI looks for Locally Installed Grunt [We install grunt locally by running the command npm install grunt --save-dev at Project Root Directory]and if found loads it. Once done Gruntjs file (holds required configurations for Grunt tasks to run) is loaded and configurations in it is applied and Gruntjs File also in turn loads the package.json file if needed which is provided by npm [generated by npm init command].
Installation of Grunt Command Line Intrerface and Setting up Grunt
Step 1: Install the Grunt Command Line Interface globally using the command npm install grunt-cli -g
Step 2: Check if grunt is installed succesfully using the command grunt --version
Thus the Grunt Command Line Interface has been successfully installed globally and would be able to access it via command line
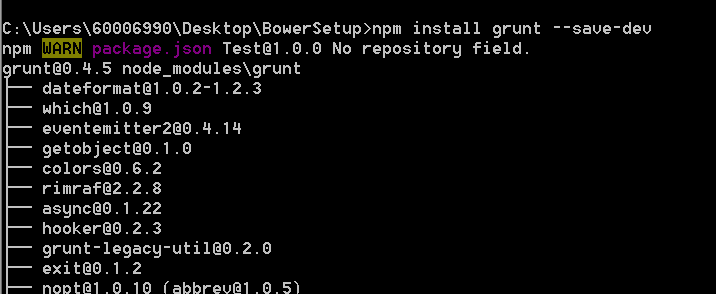
Step 3: Now let's setup the Grunt Task Runner Locally. Navigate to the Project Root Directory and run the command npm install grunt --save-dev. This would generate node-modules directory and place grunt task runner within.
Step 4: Generate the package,json file by executing the command npm init at Project's Root Directory.
We now have Grunt-Cli Installed Globally, Grunt Task Runner Locally and package.json file created.
Setting up Gruntfile.js
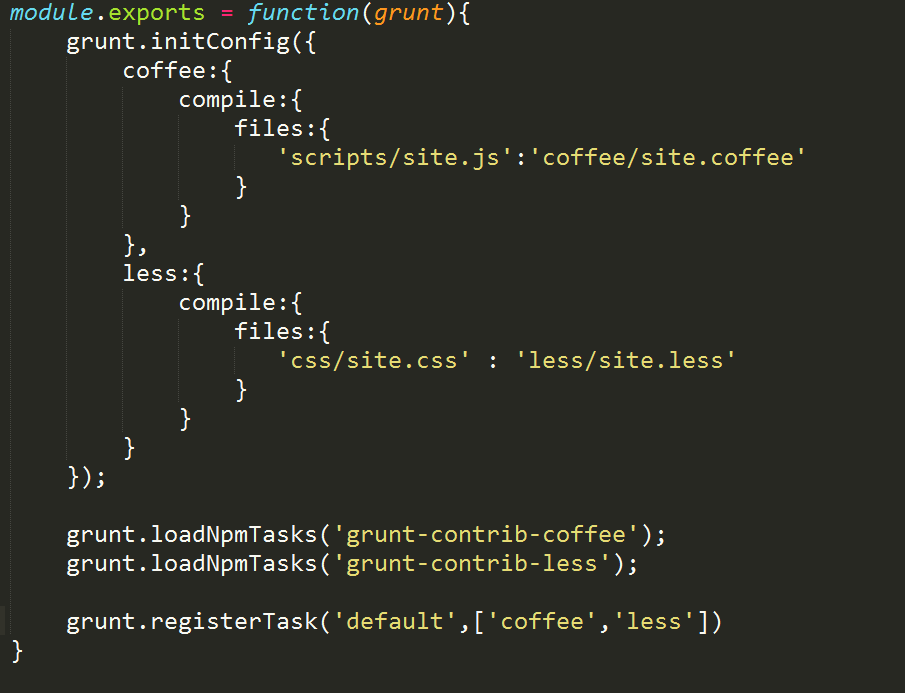
To Specify what Tasks need to be run, Register the Tasks, Load the required NPM Modules for executing the Tasks etc we need some configuration mechanism and GruntFile.js serve this purpose.
Sample Working Grunt Demo
Tutorial 1: Using Grunt, we are going to compile .less file to .css file and the .coffee file to .js file
Step 1 : Let's create a Directory that all our work would go within. Install Grunt locally by executing the command npm install grunt --save-dev
Also install Grunt Coffee Plugins and Less Plugin as below:
Step 2: Create an html file named index.html, and files site.less and site.coffee within directories less and coffee respectively such that complete working directory would be looking as below.
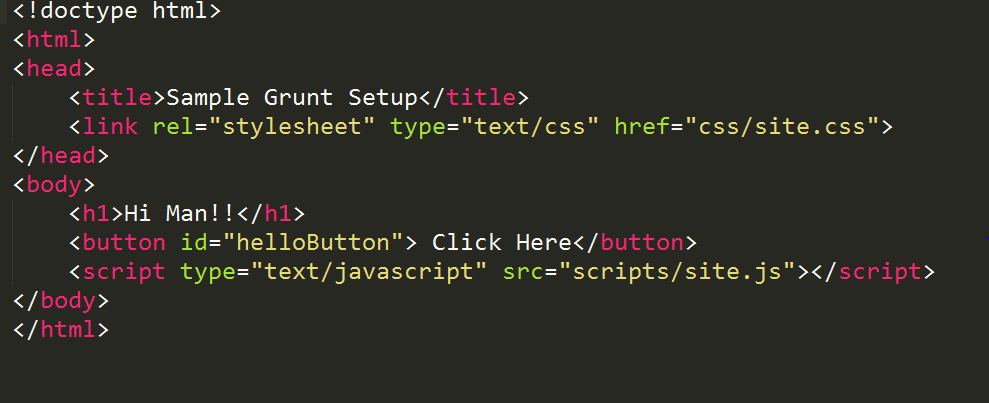
Step 3: Include these entities in the Html File, .coffee file and .less file
Step 4: Now create the GruntFile.js that takes up the required configurations to initialize the task, load the required NPM Modules, register the Task etc.
Grunt is basically a TaskRunner that automates the repetitive tasks such as minification, compilation of preprocessor language into css and also act as an effective build system.
How Grunt Works? [Just know how things work in general, we would see it in detail in sections following below]
We run the grunt command at the Projects Root Directory, Grunt-CLI looks for Locally Installed Grunt [We install grunt locally by running the command npm install grunt --save-dev at Project Root Directory]and if found loads it. Once done Gruntjs file (holds required configurations for Grunt tasks to run) is loaded and configurations in it is applied and Gruntjs File also in turn loads the package.json file if needed which is provided by npm [generated by npm init command].
Installation of Grunt Command Line Intrerface and Setting up Grunt
Step 1: Install the Grunt Command Line Interface globally using the command npm install grunt-cli -g
[ Note: Grunt-cli doesn't include the Grunt Task Runner. Grunt -cli is mainly used to process the Grunt Files located somewhere in the system. To perform automation and the Minification Task, we actually need grunt installed within the working directory.]
Thus the Grunt Command Line Interface has been successfully installed globally and would be able to access it via command line
Step 3: Now let's setup the Grunt Task Runner Locally. Navigate to the Project Root Directory and run the command npm install grunt --save-dev. This would generate node-modules directory and place grunt task runner within.
Step 4: Generate the package,json file by executing the command npm init at Project's Root Directory.
We now have Grunt-Cli Installed Globally, Grunt Task Runner Locally and package.json file created.
Setting up Gruntfile.js
To Specify what Tasks need to be run, Register the Tasks, Load the required NPM Modules for executing the Tasks etc we need some configuration mechanism and GruntFile.js serve this purpose.
Sample Working Grunt Demo
Tutorial 1: Using Grunt, we are going to compile .less file to .css file and the .coffee file to .js file
Step 1 : Let's create a Directory that all our work would go within. Install Grunt locally by executing the command npm install grunt --save-dev
Also install Grunt Coffee Plugins and Less Plugin as below:
Step 2: Create an html file named index.html, and files site.less and site.coffee within directories less and coffee respectively such that complete working directory would be looking as below.
Step 3: Include these entities in the Html File, .coffee file and .less file
 |
| index.html |
 |
| site.less |
| site.coffee |
Step 5: Execute the Command grunt at the project root directory to invoke the Grunt-Cli which inturn would generate the .css and .js file from .less and .coffee files respectiely.
Step 6: Run the index.html to find how the generated .css and .js applies.


No comments:
Post a Comment